Legacies of Veridocia: The Dark Dominion
|
} Combat Mechanics
~ |
Previous Problems
with Turn Order
In the Shining Force games, turn order has consisted of a simple
premise: one character moves and acts at a time, and they do so in an order
determined by agility plus some random factor. Forum games have been unable to
fully replicate the system in a truly satisfying way, as the various turn order
systems I’ve experienced make significant sacrifices to accommodate the
play-by-post dynamic the games need. These sacrifices were as follows:
·
Rigidly sticking to
the turn order forced players to post in a very specific order, and wait for
the GM if monsters moved in between players.
Outcome:
Unacceptably long time for rounds to resolve.
·
Removing the need
for posting in turn order completely meant that players’ post order determined
turn order instead, and all monsters moved together, after all players’ turns
were resolved.
Outcome: Agility was
meaningless, and bunching all of the monster actions together sometimes turned
out too punishing for the players. Additionally, a lack of updates to enemy
actions lead to ever-increasing player uncertainty when deciding what actions
to take, since the result of previous player actions were left unresolved.
·
Splitting the turn
into a fast and a slow phase blended the above two approaches. It limited fewer
players from posting than the first method, and broke up the enemy actions,
preventing all of the enemies from descending on the players all at once.
Outcome: Turns took
a time somewhere between the two previous methods to resolve, the enemy
onslaught was broken up a little, giving some breathing room to the player, and
agility had some significance restored to it by way of prioritising faster
players and monsters based on agility.
Simultaneous Motion
System
None of the above methods quite worked at properly utilising agility
and initiative whilst also keeping turn resolution times low. So, for Legacies
of Veridocia: The Dark Dominion, a new method for
resolving turns will be used (at least to start. If it turns out to be cack, we may have to rethink it)
The basic rule behind this method is thus: characters no longer move individually. By using an abstraction to simulate a more simultaneous form of
movement, turns should flow more smoothly and quickly, whilst giving agility
the importance it deserves.
Here is a small tutorial on how the system works. Using a small map and
a few characters from old games that agreed to come out of retirement to assist
me, I will walk through the basic mechanics of a turn using this new system.
Simultaneous Motion
Tutorial

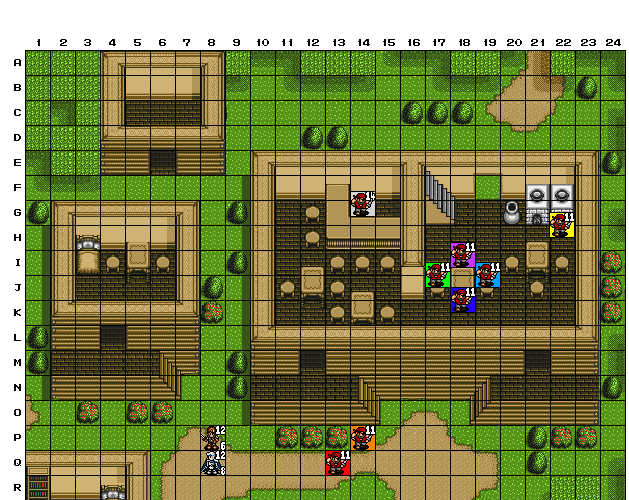
Fig 1
Figure 1 depicts a potential battle map. While some elements may change
for the official game, the map will always have gridlines and labelled axes.
The demonstration of the turn system will be carried out by two of my earlier
characters. The one in grey with brown hair at P-8 is Flynt. The one with white
hair at Q-8 is Alexis. The units with coloured backgrounds are bandits. The
background colours are used to distinguish which unit you want to target when
there are multiples of the same type of enemy. There are 8 of them:
·
Red
·
Orange
·
Yellow
·
Green
·
Blue
·
Indigo
·
Violet
·
Silver
For instance, if I were to move Alexis to square P-13, where I could
attack either bandit, I might post something like ‘Move to P-13, attack Red
Bandit’ to denote which one I wanted to hit.
With the basics of reading the map done, it’s now time to run through a
turn using the new system. To do that, I need to assign some initiative scores.
For simplicity in this tutorial, consider initiative and agility as the same
thing.
·
Flynt is the
fastest, with an agility of 8
·
Alexis is second
fastest, with an agility of 6
·
The bandits are
drunk, and all have an agility of 4
In previous systems, each unit would move one at a time. But in this
system, the following are assumed:
1.
All units move
simultaneously
2.
Attacks and other
actions resolve in order of initiative, which is derived from agility
3.
You can always take
action against your target at their starting location, even if they move from
it.
4.
The abstraction of
movement presumes that attacks or other
actions occur at any point along a character’s movement path.
Sample Turn
The first step is for the GM to determine all
enemy movements and actions first. He does not reveal them until the players
have all posted theirs. This is to prevent player moves influencing the GM’s
decisions, and vice versa.
Having done that, the players make
their posts, and can do so in any order. Let’s say that
Alexis’ player chooses to move to P-13 and attack the red bandit as described
above. Then, Flynt’s player posts his move, stating that he will attack the
bandit from Q-12.
The GM decided ahead of time that the red bandit would move to P-9 to
attack Flynt, and the orange bandit, who only has 5 MOV, can’t reach a space
that would allow him to attack, and is moved to Q-12. The other bandits are too
busy getting drunk to fight.
All units are then moved to their respective locations in order to
start resolving actions.

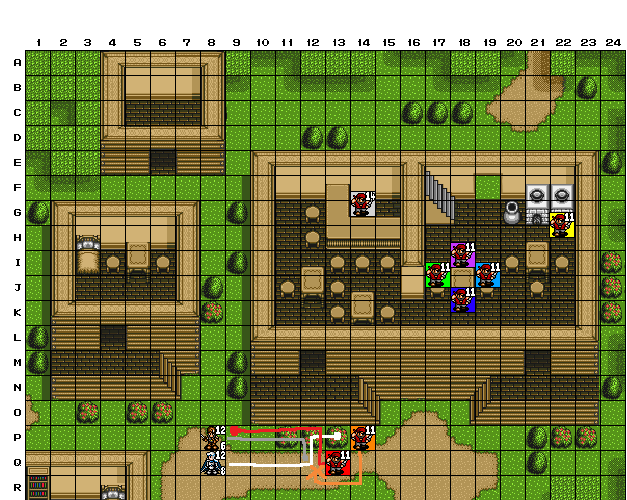
Fig 2
As you can (hopefully) see, the orange bandit has a little cross at the
end of his movement trail. This is because both the orange bandit and Flynt
stated the same square as their chosen destination. When a space is contested, the one with the highest initiative lays
claim to it, and the slower unit must choose a new place to move to. In this case, Flynt is faster than the bandit, so he gets the square,
and the GM chooses another square for the bandit to go to. He chooses Q-13. If
it had been the other way around, and it was the bandit that claimed the
square, the GM would quickly be able to tell the player that the square is
invalid, and instruct them to make a new choice.
(Tactical Tip: If you so wish, you can choose an occupied square as
your destination, whether friend or foe. So long as the original occupant
moves, you can take the square. However, if they don’t, you will be informed to
choose a new location, since you can’t contest a square that wasn’t free at the
start of the turn. If the occupant moves and someone else tries to take it as
well as you, you both contest the square as above.)
Despite Alexis’ player posting first, Flynt’s action resolves first due
to his higher agility/initiative, and he stabs the red bandit.
Alexis’ action resolves second, and he also stabs the red bandit. It is
entirely possible that their damage could kill the red bandit before its action
resolves, and if this happened, its action would be cancelled.
In this case, we assume that the red bandit does not die, and moves to
attack Flynt’s original position.
Orange bandit moves to Q-13 with a grumble.

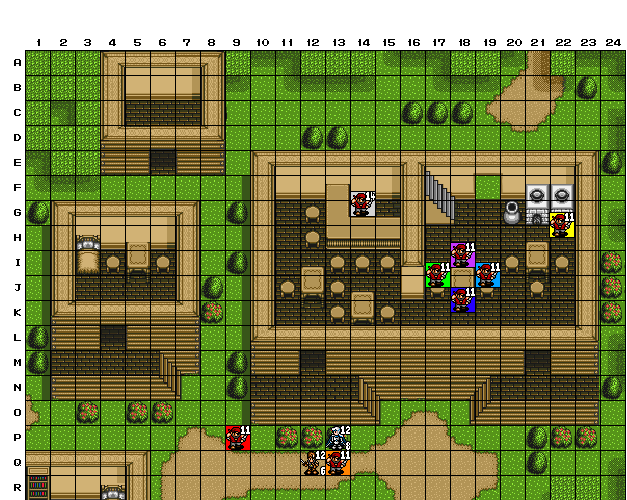
Fig 3
Figure 3 shows the final positions. It might seem a little strange that
the heroes and the red bandit ran past each other and dealt damage to one
another given how Shining Force games don’t do this. But remember the rule of
abstraction: it’s presumed that
the characters and bandits charge at each other and strike their blows as they
pass by one another. It may also seem
like the orange bandit should have been able to do something to the two heroes
now surrounding him. And the truth is he could have. Introducing:
The Marking System
A Mark is an alternative form of action that a character can choose to
take instead of moving in the conventional way described above.
Instead of posting your chosen co-ordinate and declaring your action, you simply declare one enemy unit to ‘mark’. This abstracts your character’s movement into a reactive response to the marked targets movements. It assumes that
your character uses observation and guesswork to anticipate your mark’s final
position, and intercept them.
Your own final position is taken out of your hands – if at least one of
your available paths can reach and attack your mark’s final position, you will
be automatically moved to an available location to attack from.
Why use a mark? Because there are certain benefits to be gained by
doing so, depending on whether you are faster or slower than your target:
·
If you are slower
than your target, marking them allows
you to deal additional damage to them. Under normal circumstances,
you take a damage penalty against faster characters based on the percentage difference in your relative agilities. This is
down to another abstraction: you strike at your
foe, only to barely reach their starting square in time - you deal a glancing
blow. By marking your
enemy, you instead gain this percentage as a bonus to your damage: you’ve watched and judged where they’ll end up, and charged in with all
your effort to deliver a hefty wallop to them.
·
If you are faster
than your target, marking them gives
your character a boost to evade
against your mark, based on the
percentage difference in your relative agilities: you’ve got your eye on that slowpoke, and you’re ready for anything
they might throw at you. The drawback is
that because marking is a reactionary response, your action resolves later than normal, occurring just before your
mark’s, owing to the fact that your normally-fast
character must wait for the slower character to get on with it. This may allow enemies that would normally act after you to go ahead
of you, so it’s not an ‘I win’ manoeuvre. Plan your marks carefully.
·
If two opposing units happen to mark each other, the benefits are
nullified, but so are the drawbacks. The faster unit no
longer has to wait longer for his action to happen, and the slower unit no
longer takes a penalty to damage due to being slower. Like two magnets, the two
characters move towards each other and meet in the middle, with the faster
character expending the extra MOV in the case of an odd number of squares being
between them.
Broken Marks – sometimes a mark is rendered invalid. The most common
reason for a mark to become broken is that the target ends its movement beyond your attack range. Others might include your mark being killed earlier in the turn, a status effect preventing you from
being able to move as far being inflicted on
you before your action resolves, or the only valid position
being taken by a faster unit than you.
Whatever the reason, if a mark ends up being broken, that character has
effectively lost time. This will put the unit into a state of ‘Impatience’,
which prevents them from using a mark on their next turn: they’re impatient
that they waited around for nothing, so they don’t want to wait around any
longer.
Broken marks could potentially be somewhat common. As such please
follow the following golden rule:
Whenever you mark an
enemy, ALWAYS:
1.
Include a d100 roll and a d26 roll (or whatever your variance die is)
in case your mark triggers.
2.
include an alternative standard move in your post in case your mark
breaks.
Marking with Magic
You can cast magic when marking someone. There are risks to this
though. Since you don’t know where your target will end their turn, you may hit
fewer targets with your AoE spells, and since you’re
not in control of your final position either, clever enemies could draw you
further away from your sturdier allies than you might be comfortable with. A
mage isolated from her tank allies is easy prey. Fortunately, the bonuses
associated with marking still apply.
(Tactical Tip: It is possible to also mark allies with healing or support
magic. This is very useful to do if the force is on the move so that the
healers can keep pace with their allies, or if your ally is not close enough to
heal or buff at the start of your turn.)